Keeping Snow Off a Heat Pump’s Outdoor Unit in New York
Snow clearance for a heat pump outdoor unit is decided at install: mount it above your local snow depth, drain the defrost meltwater, and keep it out from under the roof line.
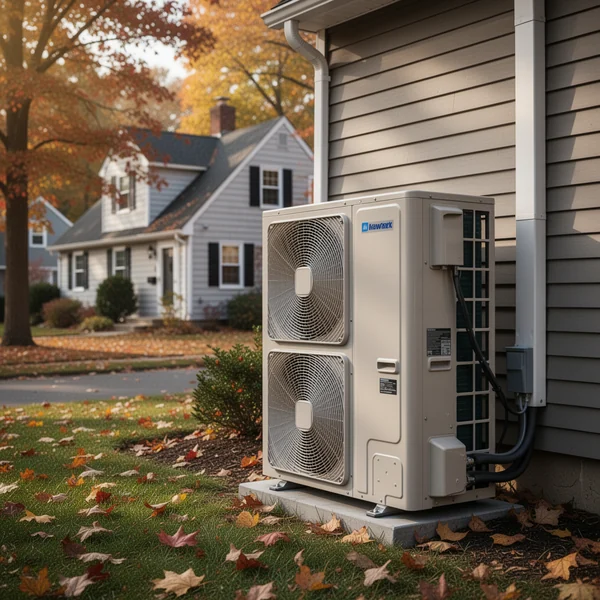
A heat pump’s outdoor unit needs clearance on all four sides and underneath, and in New York the underneath is the one people get wrong. Snow clearance for a heat pump outdoor unit means mounting it high enough that the coil sits above the deepest snow your location actually gets, on a base that lets defrost meltwater drain away instead of freezing into a block under the fan.
Get that right at install time and the unit largely looks after itself. Get it wrong and you will spend February with a shovel, and the unit will run its defrost cycle against its own ice.
Why height is the whole game
The outdoor coil breathes through its sides and exhausts through the top. If snow banks up against the coil, airflow stops, capacity collapses, and the unit works harder to deliver less — usually on precisely the coldest day, when you needed all of it.
New York’s snow is not one number. Watertown, Oswego and the Tug Hill Plateau east of Lake Ontario take some of the deepest lake-effect accumulation in the eastern United States. Buffalo and the Southtowns get bands off Lake Erie that can drop a season’s worth in two days. Syracuse, Rochester, the Adirondacks and the Catskills all sit well above what a Long Island or Westchester installer treats as normal. A stand height that is generous in Hempstead is inadequate in Lowville.
The practical rule: set the bottom of the unit above the deepest snow you have seen on that side of the house, not the average, and add for what comes off the roof. Two mounting approaches do this:
- Wall brackets. The unit hangs off the exterior wall, entirely clear of the ground. Best in deep-snow country. The wall must be structurally sound, and vibration isolation matters or you will hear the compressor in the room behind it.
- Elevated stands or extended legs. The unit sits on a pad or on ground screws with tall legs. Easier to service at eye level, and it keeps the pad from heaving.
Either way the unit should be on a base that does not settle. A slab poured directly on soil in the Mohawk Valley will move with frost, and a tilted unit drains condensate the wrong way.
Defrost is meltwater, and meltwater becomes ice
In cold, damp weather the outdoor coil accumulates frost. The unit periodically reverses to melt it off — that is the defrost cycle, and the steam you occasionally see rising off a heat pump on a January morning is normal, not a fault. What comes off the coil is water, and it has to go somewhere.
If it lands on a flat pad it refreezes. Over a few weeks of freeze-thaw, a New York winter builds a mound of ice under the unit that eventually reaches the fan blade or the coil. That is the failure mode you actually see on service calls upstate, and it is a drainage problem, not an equipment problem.
What prevents it:
- A gravel or crushed-stone bed under the unit that lets water percolate away instead of pooling.
- A base pan heater where the manufacturer offers one for cold-climate installs. It keeps the drain path in the bottom of the unit open. Ask specifically whether your model has one and whether it was wired.
- Clear ground fall away from the unit, so meltwater runs off rather than back under.
The three placement mistakes
Under the roof drip line
Snow and ice sliding off a roof onto an outdoor unit will destroy it. This is the single most expensive placement error in New York, and it is worst on metal roofs, which shed their entire load at once in an afternoon thaw. Ice dams at the eave do the same thing more slowly, dripping continuously onto the coil and building an ice shell.
Put the unit on a gable end where there is no eave above it, or fit snow guards on the roof above, or build a proper overhead shelter — one with an open-sided roof that catches falling snow without restricting airflow to the coil. A shelter that boxes in the sides is worse than no shelter.
In the plow bank
A unit beside the driveway will be buried by the plow, or by you, the first time you clear after a storm. Nobody plans this; it just happens because the unit went where the refrigerant run was shortest. Walk the site in your head in February before you agree the location.
Boxed in “to protect it”
Well-meant enclosures, decorative screens and lattice boxes are a recurring cause of poor performance. The unit needs free air on the coil faces and unobstructed discharge. Keep the manufacturer’s stated clearances, and treat anything you build around it as decoration that must not touch those distances.
Clearing snow without destroying the unit
Some rules that are worth more than they look:
- Never chip ice off the coil. The fins are thin aluminium and the tubing behind them holds refrigerant. A screwdriver or an ice scraper puts a hole in a sealed system, and that is a major repair, not a top-up.
- Use warm water, not boiling. Lukewarm water poured over a frozen coil clears it without thermal shock. Boiling water on cold metal is how you crack things.
- Do not switch the unit off to “let it thaw”. The defrost cycle is the thing that clears the coil. Turning it off removes the mechanism. If ice keeps returning, the problem is drainage or airflow, not the setting.
- Clear a path around it, gently. A plastic shovel and a soft brush. Do not lever snow off with the shovel edge against the casing.
- Never blow snow at it. A snowblower discharge packs wet snow into the coil and can throw gravel through it.
- Check it after every big storm, and especially after a thaw-freeze cycle, which is when the ice mound forms.
If you also have solar
Households that electrify heating and generate their own power run into the same season from two directions. Panels shed snow differently depending on pitch and coating, and the temptation to help them along causes its own damage — our guide to snow on solar panels in New York covers what is safe to do and what is not. Worth reading alongside this one, because the same roof avalanche that clears an array is the thing that lands on the heat pump below it.
Money, briefly and accurately
None of this is rebated as its own line, but placement affects what your equipment costs to run all winter, which is a larger number than the brackets. On incentives: a 2026 install gets nothing federal. Section 25C, which carried the $2,000 heat pump cap, applied to property placed in service before 31 December 2025, and Section 25D terminated for expenditures after that date.
What remains in New York is the NYS Clean Heat rebate, administered by NYSERDA with seven sponsoring utilities — Central Hudson, Con Edison, National Fuel Gas, National Grid, NYSEG, Orange & Rockland and RG&E. PSEG Long Island is not one of them and runs its own separate programmes. Amounts are not published as one statewide table; use the official address finder at cleanheat.ny.gov/find-available-rebates/. And note that New York’s Form IT-255 credit — 25% of system cost up to $5,000 — is a solar credit, not a heating one.
What to do next
- Before the contractor sets the pad, walk the proposed location and ask three questions: what is above it, where does the plow throw snow, and how deep does it get here in a bad year.
- Ask for wall brackets or tall legs explicitly if you are anywhere near Lake Ontario, Lake Erie, the Adirondacks or the Tug Hill area — do not assume the default stand height is regional.
- Specify a gravel bed under the unit and confirm whether your model has a base pan heater and whether it was wired.
- If the unit must sit under a roof plane, budget snow guards on that roof in the same job.
- Put a plastic shovel and a soft brush where you can reach them without walking past the unit.
- After the first thaw-freeze of the season, look underneath the unit, not just at it.
NY Solar Incentives
Independent New York solar research. We summarise NYSERDA, NY-Sun and federal programme rules from published sources and state plainly when a figure is an estimate. We are not a government agency and do not sell equipment.
Run the arithmetic on your own system
Check the dated program table and your arrangement before counting an incentive. Standard residential NY-Sun blocks are closed; Long Island Affordable Solar has a conditional income-verification route. The NY credit depends on qualified costs and tax liability, while the NYC abatement reduces future property-tax bills. The estimator keeps those timings separate.